DVWORKSHOPS INSTRUCTOR ARON RANEN'S LECTURES
ON STORYTELLING & VIDEOGRAPHY NOW ON-LINE
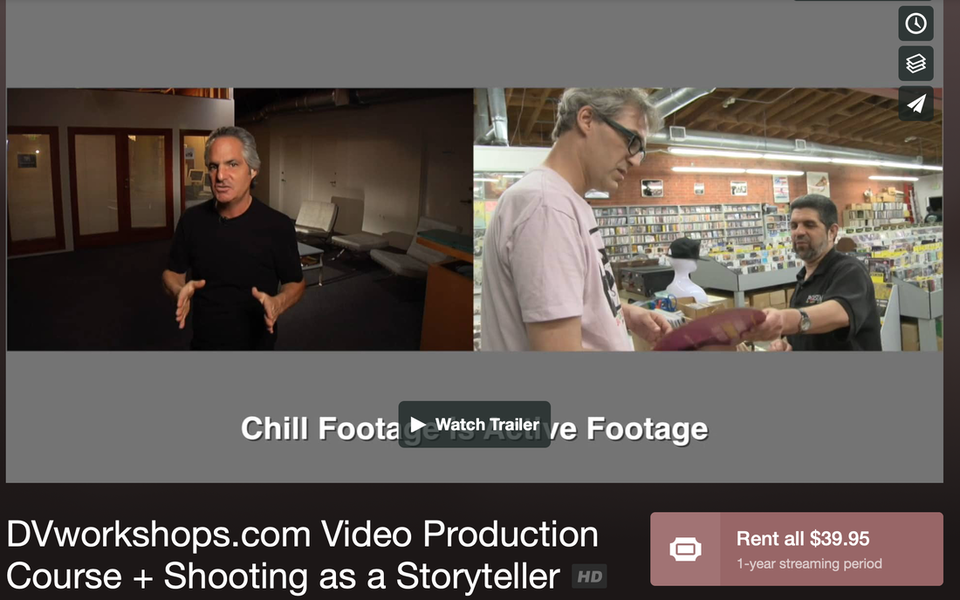
video production course
|
|
Free Video Production Tutorials
Best "On-Camera" LED Light for Video Production
Click Article below to read more and follow links to purchase products
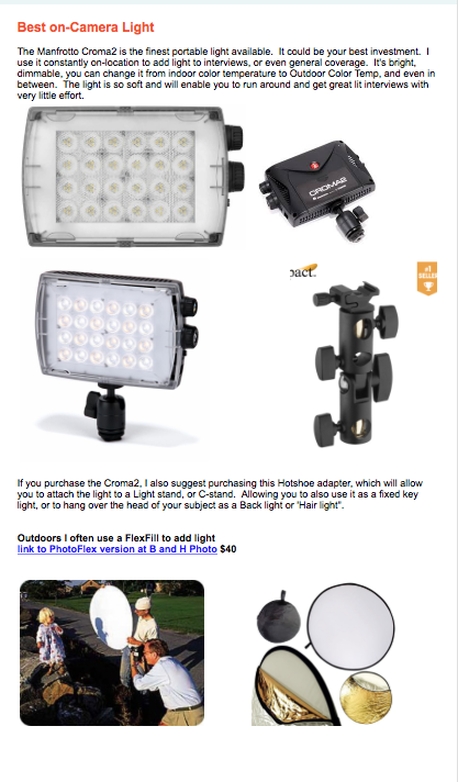
Best lights for video production
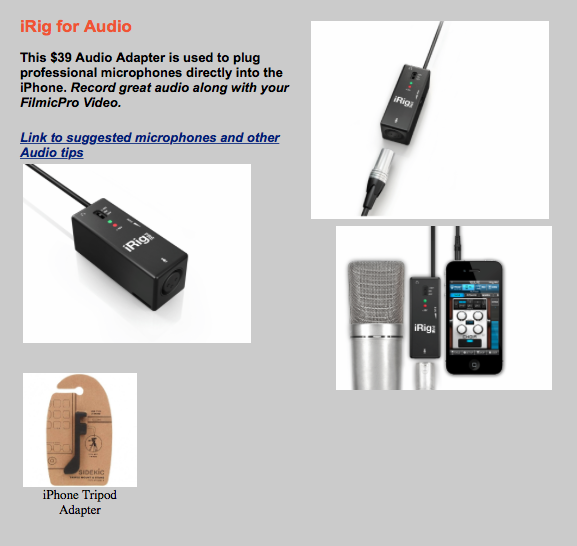
Video Tools foR IPhone
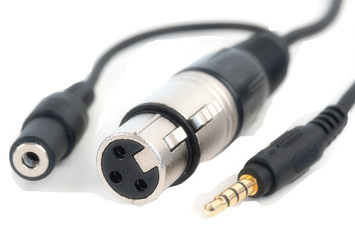
Audio Adapter for iPhone. Allows you to use professional XLR microphones.
|

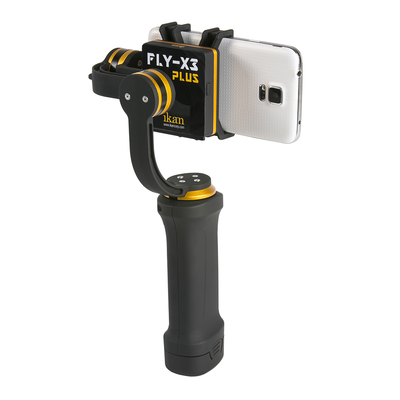
iPhone Video Stabilizers
|
|
Click above images to check out an inexpensive audio adapter (allows you to use XLR professional microphones with your iPhone), and Video Stabilizers for handheld iPhone shooting.
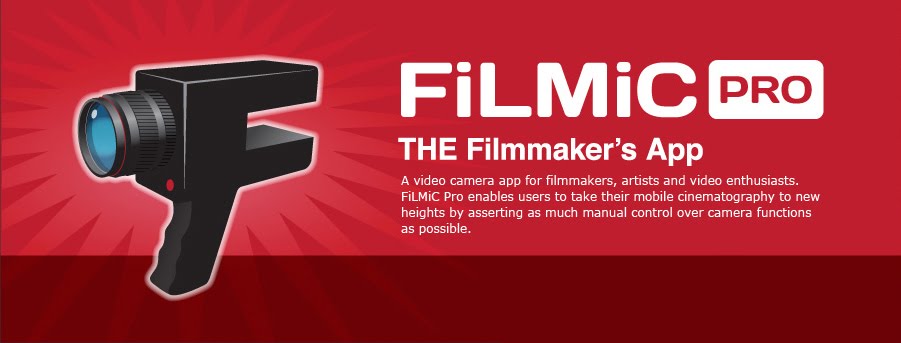
Below is Filmic Pro, the best App for your iPhone. It allows you to manually control focus and exposure, shoot up to 4K, and 50mbps at 1080 (similar to high end broadcast news cameras). It's a $10 purchase at the App store. Now available for both Android and iPhones. Click below for more info.
Below is Filmic Pro, the best App for your iPhone. It allows you to manually control focus and exposure, shoot up to 4K, and 50mbps at 1080 (similar to high end broadcast news cameras). It's a $10 purchase at the App store. Now available for both Android and iPhones. Click below for more info.
Filmic Pro for iPhone and Android
Learn Video Interview Techniques
Need to conduct a documentary, corporate video, news or marketing customer Interview? Here are some quick tips to help you avoid costly mistakes while shooting.
Do your research. If it's a corporate video, read through the last annual report, this will give you the ability to qoute sales figures, and demonstrate your understanding of the company's big picture...gaining you respect in the interview room.
Before you start the interview, relax your subject by going over the questions that will be asked. Don't let them answer, (then your bites will seem rehearsed) just go over the topics to be covered. This helps to get folks to trust you and relax. If this is an opposition interview, an investigative report, you may not want to share beforehand.)
Watch this 3-minute video to learn effective Interview techniques for Documentary, News, Corporate and marketing video production. Learn how to "build" your questions from the subject's answers and more.
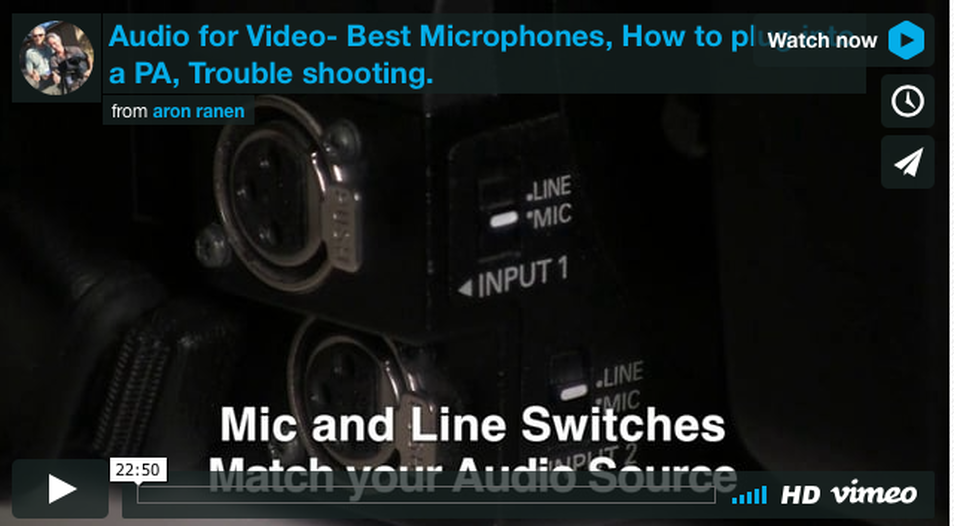
Basic Audio For Video free Tutorial
Best Microphones
Line vs. Mic Level
How to plug into a PA System
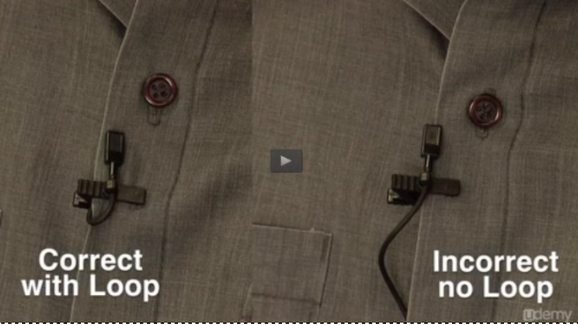
Proper lavalier Clip & Wire Placement
& Trouble shooting.
click below to watch video
|
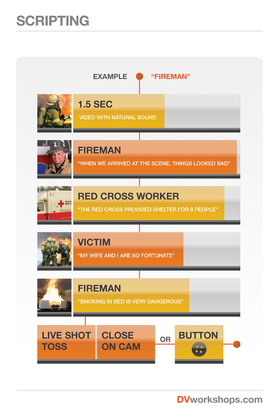
Soundbite Flow Chart
|
Ever find yourself in the position of having to quickly edit a short reality based video?
It could be a news segment for a TV station or local newspaper website...perhaps it's a short promo or corporate video.
No matter what the subject..there is an easy way to write and organize your material without pulling your hair out.
Step One:
Evaluate your footage..find the best Sound bites and Chill Footage (Cinema Verite) segments. For a short video, all you need are three to six good Soundbites. Soundbites are short clips selected from an Interview.
It just makes sense to use the best material you have. Don't get tied down by WORDS..think best experiences...strongest Interview bites...Just watch your footage and take notes..The best material needs no rationalization. It just works. Use the timecode on your camera or editing software to note the timing of the best stuff. ( Final Cut Pro X has some great ways of organizing inside the software, Keyword collections and more)
Step Two:
Arrange the best Interview elements them in the order they will appear. I call this the "Sound Bite Flow Chart"...it's a rough outline. I then start scripting and write to the Bite.
Once you have an idea of the flow of your main elements. You can begin to script...this is easier and more fun than trying to be an Einstein and create a script out of thin air.
Step Three:
Start brainstorming the connections between these elements and then begin to "Write to the Bite".
The elements tell you what to write. Start connecting the dots..
Instead of creating the narration out of thin air, Soundbites help tell you what to write.
EXAMPLE: You are writing a promo video. You have an Interview with a customer as your Second Sound Bite....that means you need to write "set up" narration that introduces this person and what they are going to say.
This technique of finding the best stuff..organizing a rough order, than using these as a guide to writing your script is a common technique for writing news segments.
Step Four:
Your last soundbite..at the bottom of your "Soundbite flow Chart" should be a "BUTTON"
TV producers are always looking for a sound bite or simple phrase that "Buttons up the piece", it adds closure to the segment.
As you are going thru your footage...you will most likely stumble upon a phrase that really does sum it all up...in an emotional way..or using humor....you will know it when you see/hear it...you mind will say" Hey that's a nice Button for the piece"...start searching for buttons when you log your footage.
Summary
Please click on 5-minute Video below to watch DVworkshops.com Instructor Aron Ranen explain how to "WRITE TO THE BITE"
It could be a news segment for a TV station or local newspaper website...perhaps it's a short promo or corporate video.
No matter what the subject..there is an easy way to write and organize your material without pulling your hair out.
Step One:
Evaluate your footage..find the best Sound bites and Chill Footage (Cinema Verite) segments. For a short video, all you need are three to six good Soundbites. Soundbites are short clips selected from an Interview.
It just makes sense to use the best material you have. Don't get tied down by WORDS..think best experiences...strongest Interview bites...Just watch your footage and take notes..The best material needs no rationalization. It just works. Use the timecode on your camera or editing software to note the timing of the best stuff. ( Final Cut Pro X has some great ways of organizing inside the software, Keyword collections and more)
Step Two:
Arrange the best Interview elements them in the order they will appear. I call this the "Sound Bite Flow Chart"...it's a rough outline. I then start scripting and write to the Bite.
Once you have an idea of the flow of your main elements. You can begin to script...this is easier and more fun than trying to be an Einstein and create a script out of thin air.
Step Three:
Start brainstorming the connections between these elements and then begin to "Write to the Bite".
The elements tell you what to write. Start connecting the dots..
Instead of creating the narration out of thin air, Soundbites help tell you what to write.
EXAMPLE: You are writing a promo video. You have an Interview with a customer as your Second Sound Bite....that means you need to write "set up" narration that introduces this person and what they are going to say.
This technique of finding the best stuff..organizing a rough order, than using these as a guide to writing your script is a common technique for writing news segments.
Step Four:
Your last soundbite..at the bottom of your "Soundbite flow Chart" should be a "BUTTON"
TV producers are always looking for a sound bite or simple phrase that "Buttons up the piece", it adds closure to the segment.
As you are going thru your footage...you will most likely stumble upon a phrase that really does sum it all up...in an emotional way..or using humor....you will know it when you see/hear it...you mind will say" Hey that's a nice Button for the piece"...start searching for buttons when you log your footage.
Summary
- Don't try and be a genius and write the script first, base your writing around pre-existing clips.
- Find the best sound bites
- Arrange them in an order that tells your story
- Write to the Bite and create a script based on the material you have.
Please click on 5-minute Video below to watch DVworkshops.com Instructor Aron Ranen explain how to "WRITE TO THE BITE"
Best Microphones for Video Production
for Interviews, corporate video production, Documentaries or News.
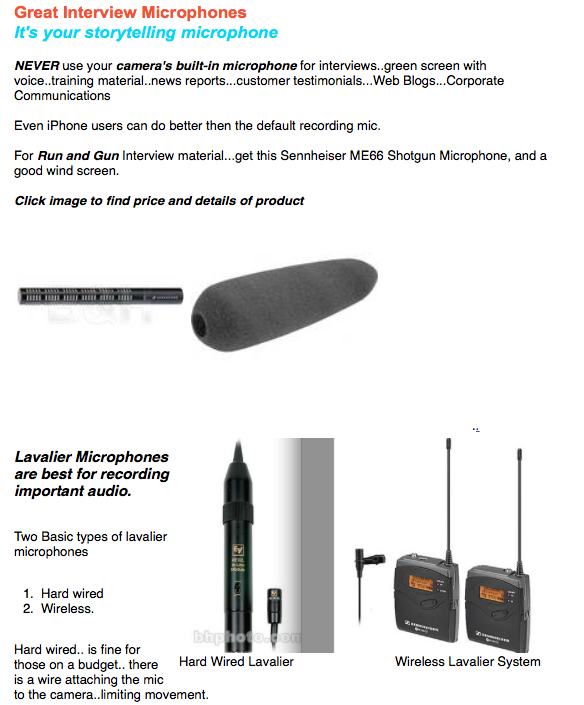
Best clip-on Lavalier microphones for Corporate, documentary, news, web marketing video productions.

Best wireless microphones for video production
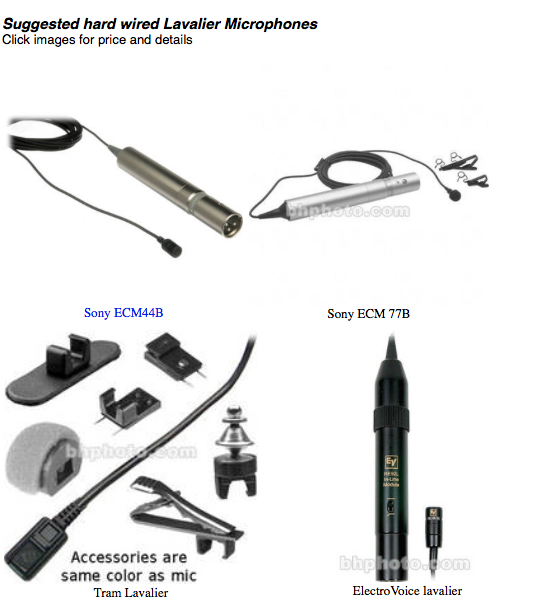
Best Lavalier (clip-on) microphones for video production
Correct method of putting on a Lavalier microphone
Microphone Adapters for iphone Video. Filmmaking with the iPhone
How to Prepare for a
Corporate Video or TelevisioN
Appearance
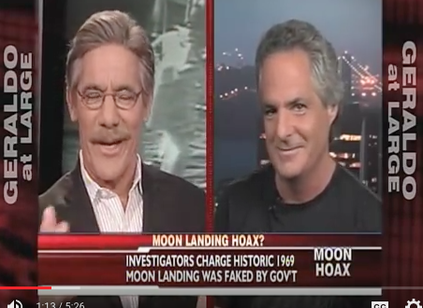
Aron Ranen on FOX News with Geraldo
|
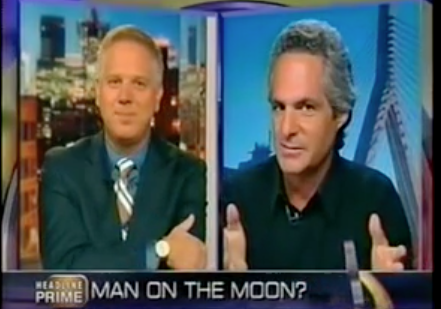
Aron Ranen on CNN with Glenn Beck
|
For Corporate Executives, Association Directors and Documentary Filmmakers, being on TV is now part of your marketing plans. When a Television or Corporate video appearance comes knocking, are you or your colleagues ready?
How can you control you or your co-workers appearance on TV? Is there a way to deal with a confrontational Interview and win?
Two weeks ago NASA admitted they had lost high quality Video of Neil Armstrong's first moonwalk..turns out these video signals were recorded on 1" Telemetry tapes...tapes that I discovered were missing in my investigative documentary film, Did We Go?.
CNN called and asked me to appear on the Glenn Beck Show, seen nightly on CNN Headline News.
For the past decade I have been training people how to appear on television, here some suggestions
- Start the interview by asking a question of the host...that shifts control to your side..and often can catch the interviewer unaware...giving you an upper hand in the timing.
- Get make-up artist if possible..The tiny TV studios that you will be asked to appear in have harsh bright lighting, this may create glare on your forehead..or even worse if you are bald.
- Sit down and create three main talking points or sound bites that convey YOUR message.
- Try and draw visual images for the viewer. You can contrast and compare. for example..on CNN I said, " They can keep track of 2,000 year-old Egyptian pottery, but NASA loses 40 year old tapes?". I contrast and compare, creating a visual image in the viewers mind,
- No matter what the question, stick to your main 3 points. For example: On CNN the host asks me about NASA's Challenger Shuttle explosion..I am not an expert on that...so I told him, "I'm an expert on the moon landing" and then I went into my second pre-planned sound bite regarding the Cold War and NASA.
- You do not need to be an expert on anything outside your area of expertise...Hosts will try and get you to comment on other issues...simply tell them "That is not my area of expertise...but let me tell you about..." or simple say " I don't know..I have never studied that...but my film does cover this subject".
- Always build the big picture. I try to start the interview by addressing the big picture to involve even those who are not aware of my subject.
- Never get angry or upset..it does not work on TV.
- Think about your closing statement, use a visual metaphor to sum it all up. In the CNN Interview I said, "They want us to believe in the moon landings like it was Peter Pan."
- Send the program video of your product, office, Internet site or clips from movies. CNN used clips of my film from Youtube.com
|
|
Off with your T-Heads!....great editing technique for Documentary filmmaking
Learn how to make your documentary a festival winner, create non-fiction films that touch people's hearts.
What is the Headless Horseman edit?
Simply put, it involves the elimination of the visual attached to a talking head during most of your film.
Using the "Headless Horseman Edit", your Documentary will take on the tone of a narrative dramatic film, instead of looking like cable television.
You can see this technique in the recent documentary Beyond The Call Directed by Academy Award Nominated Adrian Belic (Genghis Blues 2000). During the first third of the film, Adrian introduces the characters with on-screen-interviews. . During the last part of the film Adrian NEVER cuts back to an on-screen talking head (sit-down interview).
For the last Third of the film, Adrian eliminates the talking head visual all together. He uses the audio from these interviews, but never with it's picture..only as sound bites "under action" to help describe or add a character's reflection on the unfolding event.
For example, in BEYOND THE CALL, there is a scene where a Character named Ed, screams at a Vietnamese Border Guard who refuses to let him enter a refugee camp he wants to re-supply. He yells at the guard and get's nowhere. After his tirade, he walks away, and you hear the voice of another main character saying, " Ed needs some lessons in how to win friends and influence others". It creates a humorous moment, and helps give perspective on what is happening in the film...BUT remember you DO NOT SEE this man on screen with this comment..ONLY his voice is used, over images of him and Ed walking away from the entrance to the Refugee Camp.
How do you know who is speaking if you can not see their face?
Begin the character's sound bite when you see him/her on screen engaged with the person/situation he is talking about. In Adrian's film, he began the Headless Horseman Edit with a shot of both the men together after the failed attempt by ED to convince the Guard to let them into the refugee camp.
Summary
- The Headless Horseman Edit
- Off with your Talking Heads!
- Cut the Talking-head visual out of your film
- Create a more Dramatic, less Television looking documentary
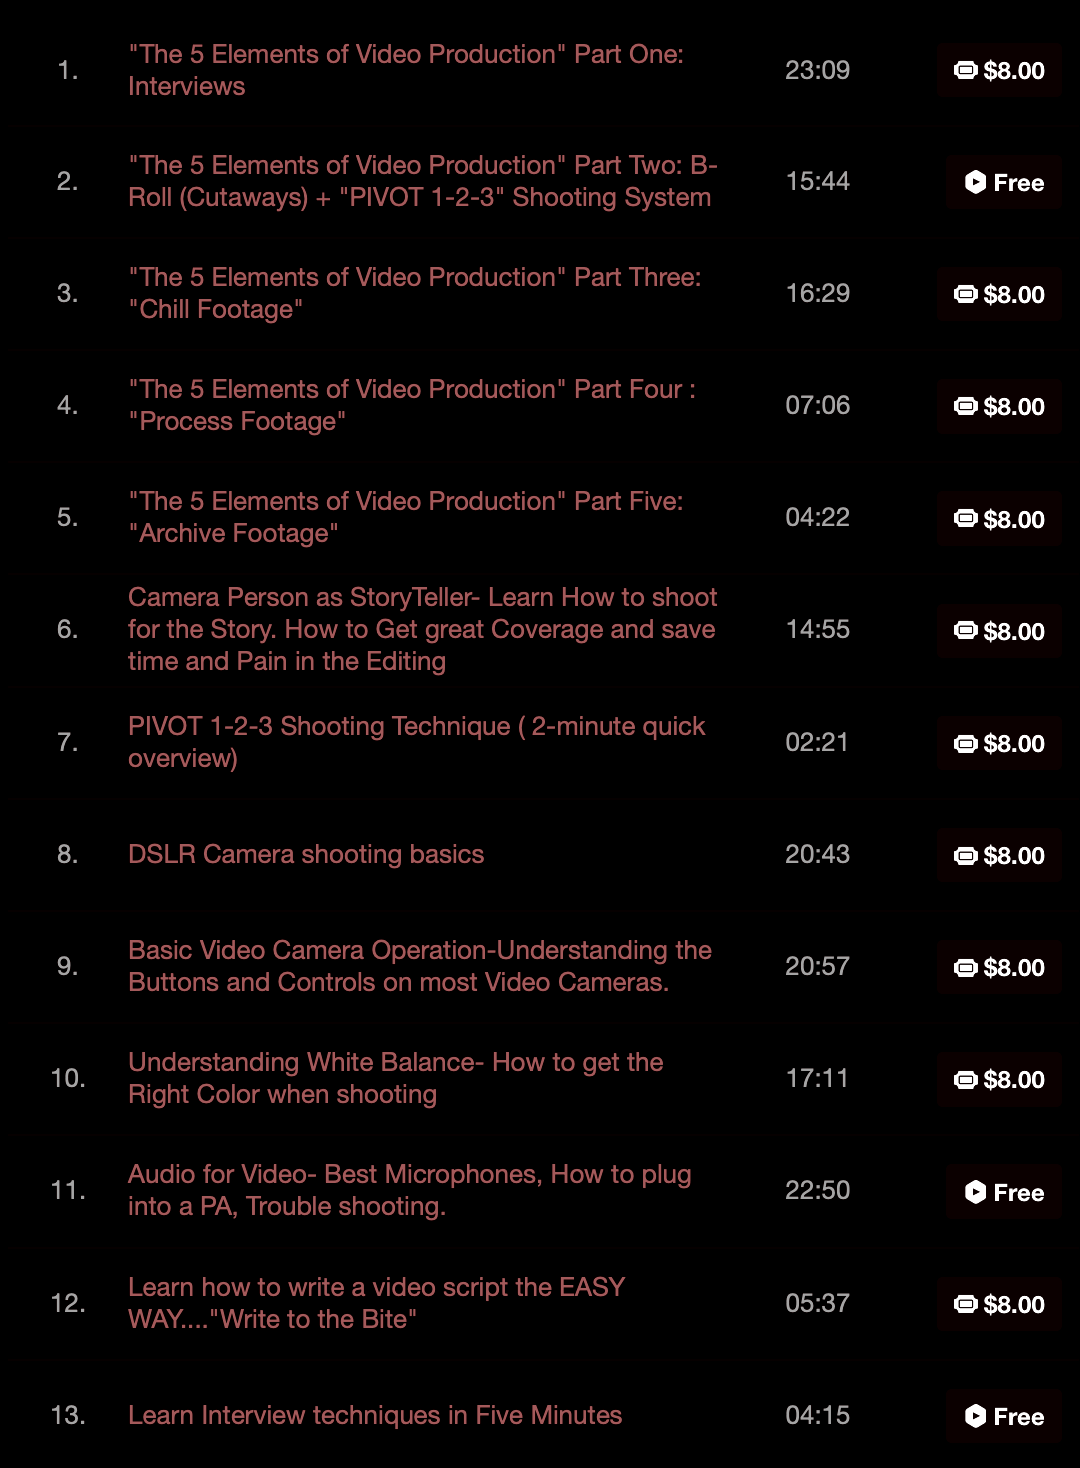
The 5 elements of video production

Free: The 5 Elements Overview from aron ranen on Vimeo.
Interviews B-Roll / Cutaways "Chill Footage" Process Footage Archive
How to compose a basic Interview shot
1. Interviews
Frame the person using negative space, have them fill roughly 1/3 of the screen, on the left or right side. Make sure their "Gaze" is into the Negative space.
Leave room behind the subject, never interview someone right in front of a wall. Leave 4-15 feet between the subject and the wall, you will notice the person's shadow disappear from the wall. Watch out for reflections in people's glasses ,turn them away from facing the window to solve the problem.
The Background influences the way the person is perceived. When I walk in to shoot an interview, the first thing I do is look for a background that will reveal something about my subject. Build your questions from people's answers. repeat their last few words, ask "open ended questions" ( ones that can not be answered with a "Yes" or "No". For example, "Can you describe?", or "tell me about this...".
2. B-Roll - also known as "Cutaways"
B-Roll / Cutaways:
These are "Stand-alone" shots, similar to still photography.
Shoot tons of Cutaways, and you life will be easier in the editing room.
Cutaways can be store signs, close ups of ashtrays, a clock on the wall, people's faces, a candle, a shot of a highway. I always get shots of the exteriors of every place I film, and some neighborhood shots. I try and treat 80 percent of my cutaways like still photographs, I will track or pan for 20 percent.
This is the time you can squeeze some visual poetry out of documentary. Always keep your eyes open for "shots" that evoke something about the truth of the situation, or make you feel.
Hold your shots still..don't move the camera....you will make it "move" in the editing process by cutting many of these together. Record 15-20 seconds for each shot.
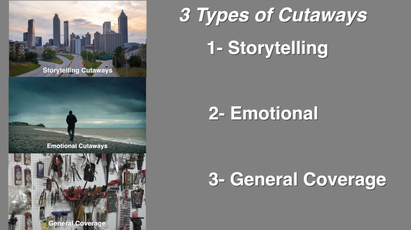
There are three basic types of Cutaways that I suggest you always search for.
GET CLOSE UPS in your B-roll. Take the camera off your shoulder and shoot up from low in the ground. Hold it in the air with a mono-pod ( or drone ).
Learn more about shooting as a storyteller by watching the videos at this link
3. "Chill Footage"
Chill Footage: (otherwise known as Cinema verite or Live Action)
This is the only video school that teaches the theory of "Chill Footage".
It is the hardest thing to do..just sit back and "Chill" and film what ever is going on with your subjects.
DO NOT TALK or interact with them...do not be impatient...the moment will come when your characteer reveals him or herself on film, and you will rolling when it occurs. Don't worry..."The moment" will happen, you just gotta keep shooting, be sure to tell your subjects to "Pretend I am not here, that I am just a fly on the wall."
There are Three Elements of Character Development, and Chill footage' is helpful in revealing the EMOTIONAL part of your character. You see it in the way they try and get what they want from those around them...it is called the MODE/NEED.
4. Process Footage
This is when you film the making of your documentary. Think of it like combing theBehind The Scenesfootage of your film with the Documentary itself.You can be on-camera ( like the guy in Super Size Me or Michael Moore)...perhaps we just hear your off-screen voice, with a glimpse of you thru- out the film. If you need shots of you on location, give the camera to a "civilian" for a few minutes .
Nick Broomfield is a documentary filmmaker that uses a lot of Process footage. Rent Hedi Fliess, Hollywood Madam, or his best , but hard to find documentary "The Leader, his Driver, and his Wife". Werner Herzog also makes great films in this style, "Little Dieter needs to fly"is worth renting to see how his style is differnet from Michael Moore's. A great example of Process footage "The Gleamers and I"..by Agnes Varda,,(pictured above) she is an awesome filmmaker. Film the Making of your film, shoot when you are walking up to someone's door (for real, don't fake it). Film The Process.
5. Archive
Government agencies have free footage Click here to read our past newsletter about Archive Sources and Links
Always ask people you are filming for photographs and old video of them etc....Scanning is the best way to import them into a digital editing system, but you can get a shot with your DV and HDV camera that can later be made into a still frame, and panned and zoomed through (aka Ken Burns style). Also if you are making a film about a controversial subject, try contacting local news stations to see if they have any old news stories that you can use.
The National Archives in College Park, Maryland is one of the world's best resources. I spent 3 days there gathering footage for my NASA documentary,and Found valuable Footage shot by the Nazis that I later used in my film.
Summary
Also be thinking about Music and Graphics/Animation for your edit.
Frame the person using negative space, have them fill roughly 1/3 of the screen, on the left or right side. Make sure their "Gaze" is into the Negative space.
Leave room behind the subject, never interview someone right in front of a wall. Leave 4-15 feet between the subject and the wall, you will notice the person's shadow disappear from the wall. Watch out for reflections in people's glasses ,turn them away from facing the window to solve the problem.
The Background influences the way the person is perceived. When I walk in to shoot an interview, the first thing I do is look for a background that will reveal something about my subject. Build your questions from people's answers. repeat their last few words, ask "open ended questions" ( ones that can not be answered with a "Yes" or "No". For example, "Can you describe?", or "tell me about this...".
2. B-Roll - also known as "Cutaways"
B-Roll / Cutaways:
These are "Stand-alone" shots, similar to still photography.
Shoot tons of Cutaways, and you life will be easier in the editing room.
Cutaways can be store signs, close ups of ashtrays, a clock on the wall, people's faces, a candle, a shot of a highway. I always get shots of the exteriors of every place I film, and some neighborhood shots. I try and treat 80 percent of my cutaways like still photographs, I will track or pan for 20 percent.
This is the time you can squeeze some visual poetry out of documentary. Always keep your eyes open for "shots" that evoke something about the truth of the situation, or make you feel.
Hold your shots still..don't move the camera....you will make it "move" in the editing process by cutting many of these together. Record 15-20 seconds for each shot.
There are three basic types of Cutaways that I suggest you always search for.
- Story Telling Shots- Images of "Welcome to " signs, Exterior shots of homes or offices where interviews were filmed, Images of your character entering and leaving a building, Wide shots of Cities or towns from ontop of a hill or large building. These will allow you to tell your story with out always having to use a narrator ..That's why I call them story telling Cutaways.
- Emotional Cutaways- Since film has the unique ability to make people feel...the way to construct emotional sequences is to first film shots that have emotional content built into them. For example a solitary man sitting on a park bench...two people walking hand in hand...A close up of a hand while they are praying...shot of a candle ....incense burning...people hugging...
- General Coverage- These are very important..if you are filming a race car contest...you had better get shots of people watching the race...cheering...the hot dog stand...people lined up to get in...Ushers tearing ticket stubs at the entrance (close-ups)...people cooking out in the middle of the raceway...a close op of flags, loudspeakers and race track signage. You will need all of these....get lot's of general coverage shots or you will be sorry
GET CLOSE UPS in your B-roll. Take the camera off your shoulder and shoot up from low in the ground. Hold it in the air with a mono-pod ( or drone ).
Learn more about shooting as a storyteller by watching the videos at this link
3. "Chill Footage"
Chill Footage: (otherwise known as Cinema verite or Live Action)
This is the only video school that teaches the theory of "Chill Footage".
It is the hardest thing to do..just sit back and "Chill" and film what ever is going on with your subjects.
DO NOT TALK or interact with them...do not be impatient...the moment will come when your characteer reveals him or herself on film, and you will rolling when it occurs. Don't worry..."The moment" will happen, you just gotta keep shooting, be sure to tell your subjects to "Pretend I am not here, that I am just a fly on the wall."
There are Three Elements of Character Development, and Chill footage' is helpful in revealing the EMOTIONAL part of your character. You see it in the way they try and get what they want from those around them...it is called the MODE/NEED.
4. Process Footage
This is when you film the making of your documentary. Think of it like combing theBehind The Scenesfootage of your film with the Documentary itself.You can be on-camera ( like the guy in Super Size Me or Michael Moore)...perhaps we just hear your off-screen voice, with a glimpse of you thru- out the film. If you need shots of you on location, give the camera to a "civilian" for a few minutes .
Nick Broomfield is a documentary filmmaker that uses a lot of Process footage. Rent Hedi Fliess, Hollywood Madam, or his best , but hard to find documentary "The Leader, his Driver, and his Wife". Werner Herzog also makes great films in this style, "Little Dieter needs to fly"is worth renting to see how his style is differnet from Michael Moore's. A great example of Process footage "The Gleamers and I"..by Agnes Varda,,(pictured above) she is an awesome filmmaker. Film the Making of your film, shoot when you are walking up to someone's door (for real, don't fake it). Film The Process.
5. Archive
Government agencies have free footage Click here to read our past newsletter about Archive Sources and Links
Always ask people you are filming for photographs and old video of them etc....Scanning is the best way to import them into a digital editing system, but you can get a shot with your DV and HDV camera that can later be made into a still frame, and panned and zoomed through (aka Ken Burns style). Also if you are making a film about a controversial subject, try contacting local news stations to see if they have any old news stories that you can use.
The National Archives in College Park, Maryland is one of the world's best resources. I spent 3 days there gathering footage for my NASA documentary,and Found valuable Footage shot by the Nazis that I later used in my film.
Summary
Also be thinking about Music and Graphics/Animation for your edit.
How to make effective corporate video
1. USE TEXT to communicate MAIN POINTS
Every time a main point is made, reinforce it with text on the lower portion of the screen.
The above scene is from a Year-End video overview I just completed for Telecare Corporation, one of the nation's leading providers of mental health care. Click above image to view the web video and see the use of text to emphasize key points.
There are some corporate filmmakers that believe the only time people get real content..is when it is literally WRITTEN on the screen.
Unlike a book, PDF document, or manual...you can not go back and easily watch the last 20 seconds of a video with out disturbing the flow. That is why TEXT on screen plays such a large role in knowledge retention. In fact not only do I use text to reinforce points, I often summarize all the information (with text) at the end of every segment and at the close of the program.
Anyone who has taken a workshop with me at DVworkshops knows that I always end the day with a summary. When teaching or persuading, the power of summary can not be underestimated.
2. Make it look like a TV Show
It's less painful to watch dry corporate material when you make it look like a TV show.
Shoot it in the style of a PBS, or reality show that you and your client/boss like.
For example:
A corporate video about technology convergence. I turned the CEO into the host and created a TV show to kick off his company's annual tech conference in Silicon Valley.
Click here to view an example of this TV Style Corporate Video
I generally do not use a tripod when shooting these types of programs.
The Technology Convergence Video was shot almost exclusively with a hand held camera, I move the camera in a manner similar to the PBS Show "This Old house" Not a lot of zooming. The camera physically moves INTO the shot and back out to the wide.
3. Training Films
Freeze the action at Critical Decision Points
How to make effective training video
A training video with a narrator that keeps talking...on and on..can do more harm than good.
...the viewer may not only disregard the information...but even fall asleep (yes, even with your genus script).
How do you keep the viewer awake and paying attention?
In training videos, I freeze the action at critical decision points, then insert an on-screen QUIZ. The viewer is asked to answer the question on the screen ( multiple choice format)...the film pauses for a moment, then the correct answer is explained and illustrated....NEVER go back and show the wrong behavior or method
For example : Sales Training Video
The scene:
Automotive Wholesalers Office
The set-up: salesperson is presenting new product...suddenly the buyer asks about delivery problems on last order.
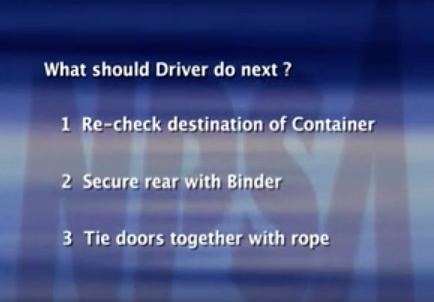
At that point we FREEZE the scene, and dissolve to a graphic quiz. Narrator asks the viewer, "What should salesperson do next?"
- Ignore shipping issues, switch subject
- Give phone number of Vice President
- Ask client more questions about this issue
- Ask for new order right away
Ask more questions to let client know you are concerned.
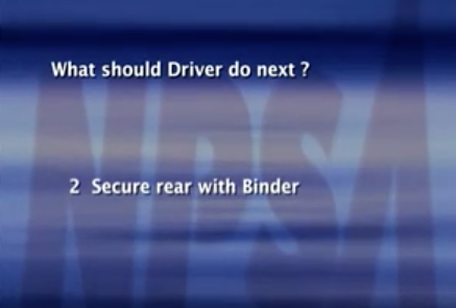
The correct answer is highlighted, and demonstrated on video.
Here is a link to an example from a "How to Load a Container" Training Video that uses this Freeze technique
The quiz begins 3 minutes into this video.
|
|
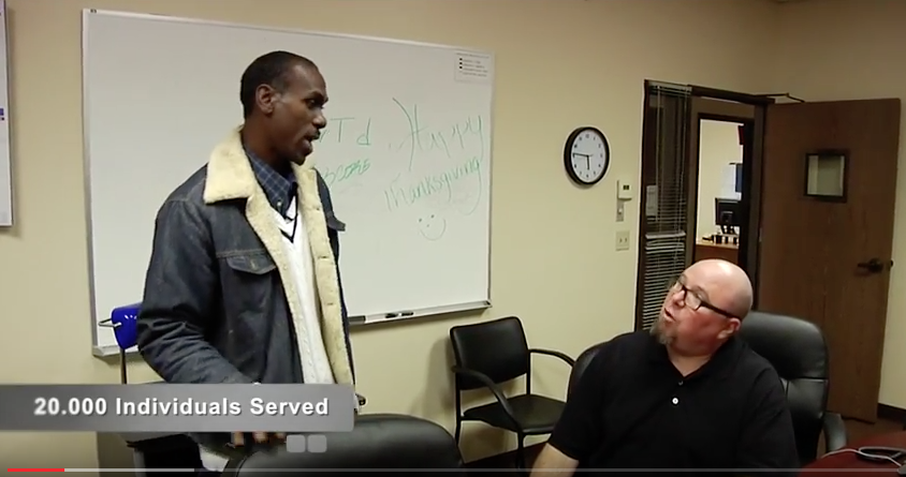
4. Tell Real People's stories
A good way to "break up" a script, or a CEO's Annual Video is to include the stories of folks from your company, or those that have been helped by it's products. Avoid the slide show with narration...go out there and tell stories.
Link to example of Healthcare CEO's annual video that uses this technique
Corporate Video Summary:
- Freeze action at critical points
- Use a quiz to create Interaction with Viewer
- Only Demonstrate correct behavior
- Make it look like a TV Show
- Use TEXT to reinforce and summarize main points
- Tell real people's stories
- Mix it up, Interviews, hand-held shooting, case studies, ceo on camera
How to Write a Video Project Proposal
Free Project Proposal Template
Below are the main project headings for use in a professional project proposal.
Objective:
Description:
Key messages
Video Development Process Overview
- Phase One: Planning
- Phase Two: Production
- Phase Three: Post-Production
- Phase Four: Mastering and Distribution Production Time-Line
Summary:
Budget of Estimated Costs
- Consulting/Scripting and Pre-production
- Location Production
- Graphics & Music
- Editing, Digitization, DVD and Web movie Creation
Total Budget: ( added here )
Below is a Sample Proposal- Use as guideline to complete your template
EXAMPLE: a proposal for a Police Recruitment Video.
Once you have copied the above template, use this to help fill out your own professional looking proposal.
Proposal Part One. Objectives, Description and Key Messages -
Walnut View Police Recruiting Video Project Proposal
January 2016
Objective:
Develop and produce a Video program for use in attracting Police officers to the Walnut View Police Department.
1- 7-12 minute police recruitment video
Description:
Using documentary film techniques, the recruitment video will show the real-life job of an officer in the Walnut View Police Department.
We will profile rookies who have been in the department for under two years, seasoned officers with 7-10 years on the force and special operations officers. The police chief will address the potential recruit, and the Mayor will communicate his personal commitment to the police department. The film will also highlight the quality of life in the city of Walnut View.
Key messages for the police recruitment video will include:
- Multifaceted team approach to fighting crime in Walnut View
- Opportunities to learn investigation skills, and conduct your own crime scenes investigations, and follow-up
- Advanced, High tech equipment, and training on this gear
- Opportunity to participate and be trained in special swat teams
- Huge Community support and respect for Officers.
- Walnut View-the City..Restaurants, entertainment, proximity to San Francisco.
Proposal Part Two: The Video Development Process
Video Development Process Overview
Phase One: Planning
- Research real-life Patrolmen to feature in video
- Coordinate and pre-produce locations and schedule shooting days/nights.
- Create rough outline
- Film all scenarios
- This includes multiple "Ride-alongs" with officers selected to participate.
- We may film at least four officers, and select the best for use in the video
Phase Three: Post-Production
- Complete rough edits of video for Client review.
- Incorporate client feedback. Re-edit video, submit for client approval or changes, then final re-edit and approval.
- The editing and filming is a collaborative team effort with filmmaker Aron Ranen and Walnut View Police Department.
Phase Four: Mastering and Distribution
- Files are also delivered in H264 format
Production Time-Line.
- September 2015 - Phase One begins
- October-November 2015- Phase One and Two are completed
- December 2015- Phase Three and Four are completed
Note that timing may change due to availability of people and locations.
Summary
By showing the real-life experiences of new and seasoned veterans, the viewer will get an honest picture of the work involved. The result, officers who will stay with the department for an extended period of time.
Proposal Part Three: Estimate of Costs BUDGET
Walnut View Police Department Recruitment Budget
Consulting/Scripting and Pre-production $1,900.00
Producer/Director $3,000.00
Location Production costs $4,600.00
Graphics & Music $ 900.00
Editing $4,400.00
Total Budget $14,800.00
Travel Expenses will be billed seperately
(This is a first proposal budget estimate..some clients may require more details)
Free Final Cut Pro X tutorials
5-minute video overview of new Final Cut Pro x 10.3 Update
Watch this next: It teaches you how to set up Final Cut Pro X Libraries and Events prior to editing.
Watch this second. Learn Final Cut Pro X editing, Final Cut Pro x Audio, Final Cut Pro X exporting and sharing
Learn how to use Apple's Final Cut Pro X Multicam
Learn how to create two images on the screen at the same time using Final Cut Pro X
The Art of Storytelling with Final Cut Pro X
$39.95
|

CLICK HERE TO VIEW DETAILS OF THE COURSE
|
Free Video Production and Filmmaking Educational Resources
Copyright 2017 Aron Ranen
Copyright 2017 Aron Ranen